So I was going through some of my old pics and stuff and collected together some guitar builds. I'll share them, unless I get bored or see something shiny. A few of the pics have gone missing but you'll get the point.
Here we go:
Starting today! This will not be a 100% accurate build to the 59 plans.
African mahogany body and neck
25.5" scale cocobolo fingerboard
stainless frets
GFS P90/bridge/tuners.
I started out today with a trip to the wood store. I was hoping to find some 13" wide mahogany for the body but no luck. It will have to be a 2pc body.
Body wood before squaring, just off of the radial arm saw

Squaring it up, about to cut the edge that will be the center glue joint. Mahogany is pretty soft so with a good blade and a saw that is set up well no more attention is needed after the cut.

ALWAYS check for square after the cut. Never trust the saw to maintain accuracy.

Gluing the body blank

Lather, rinse, repeat. This is the neck blank

After quite a few hours, un-clamp the body, scrub the dried glue off of it, and throw on some water to see the color.

The parts have been delivered from LMI and GFS. This is my favorite truss rod. It is single acting, very strong, and uses a narrow slot in the neck.
I think that I will change the tuner buttons to ebony.
(not shown: abalone dots, SS fretwire, pots and ebony knobs)

Now that I have the bridge I can calculate the neck angle. The neck is next.
So today I got started by making a neck and headstock template. The headstock template is printed 1:1 from autocad and glued to 1/2" MDF. I do not plan to bring the center of the headstock end into the little point. It is too much of a pain in the ass sanding and finishing areas like that.

The neck is laid out using the new templates.

The neck blank is 2pc, here is a shot of the end grain

Truss rod slot is cut and fitted for the truss rod. I like a nice snug fit.

The headstock and neck have been profiled with the bandsaw.

The headstock is shaped and the neck is roughed out on the bandsaw then finished using a router table and the templates I made this morning.
About to glue the fingerboard. This is where I made my first mistake on this build. The temperature was ~92 and humidity ~25%. I stopped to take a picture and by the time I had the fingerboard on the glue had skinned up and was not sqeezing out. I pulled them apart and cleaned everything up to do it again. Oh, there are a couple tiny brad points in the neck to hold the fingerboard still while applying pressure with the clamps. That make this much easier.

Clamps! I need more of them. I think that there is a garden gnome that comes and eats my C-clamps at night.

After the glue had set up for a couple of hours I pulled the neck out of the clamps and ran a router down the edges to see how the glue joint cane out. It is pretty good, though there is one spot at the 20th fret where there is a slight gap. Damn.

LP Junior body is bandsawed, sanded to 400, and a scuff coat of tru-oil has been applied:
Pic missing
I am really happy with the tru-oil so far. (2 coats) I had never given it a real try before.
I'll be leaving the grain unfilled on the finished guitar.
Here is a little wood porn, these pics were taken with the flash on so the colors are not entirely balanced.


Today I started doing the dot markers. The side dots almost my least favorite thing to do. For some reason I always get one just a little off. Actually on one build I miscounted the frets somehow and put all of the side dots in the wrong place.
These are 7mm abalone dots. I put white side dots in after this pic was taken.

About to cut the neck pocket. I normally make through neck guitars because you don't have to worry about alignment and all the wood can come from narrower boards.
This is my first try at a set neck. I've used cloth backed carpet tape to hold the router guide boards to the body.

Neck pocket is cut and cleaned up with a chisel. The drawback to using the carpet tape and sticks to cut a neck pocket is that if you bear down with the router too much then the guide can move. This happened. I'll glue on a 1/32" shim to the bass side of the neck tongue to fix it.

Neck is test fit and the angle set. Adjusting the small neck tongue to the precise angle can be a chore. This took about 2 hours.

Well, that was my day. Tomorrow I'll carve the neck, fret it with medium stainless fretwire, and glue it to the body.
Yesterday I carved the neck and put on a couple coats of tru-oil. Tru-oil does not cure on cocobolo so I will wipe some shellac on the fingerboard edge before the final coats of oil.
Today I got the frets installed and the neck glued in the body.
About fretting: I'm using stainless frets which have a reputation for being very hard and time consuming to install. Beveling the fret ends takes 15 minutes more with SS vs nickel but everything else is about the same.
I start with the fretwire bent to a slightly tighter radius than the fingerboard. I'll tap then ends down, then the middle, then working back and forth drive the fret flush. With SS wire I use a small steel hammer to drive the frets, which work hardens the playing surface a bit.

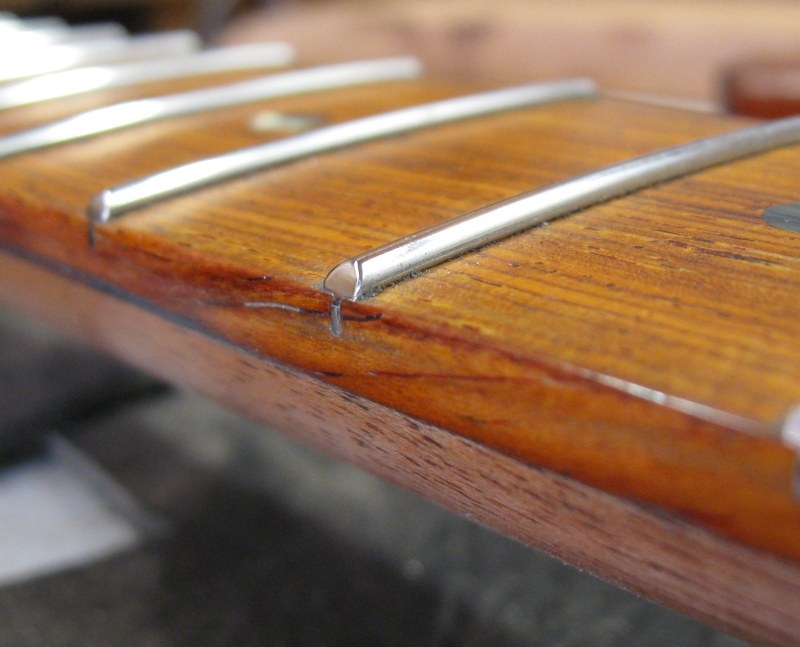
Fret is fully seated.

Going all the way down the neck. Every few frets I'll stop and check for level with a straight edge. Any high frets are hammered a little more. By having the fingerboard very true and the frets evenly seated I'll not have to remove much fret material when I level, making crowning the frets unnecessary.

Fret ends are dressed with a small file then polished with micro-mesh. The micro-mesh also breaks the sharp edge of the fingerboard.
Now for the fun part, gluing the neck to the body.

Headstock overlay and pickguard. I am going to use wenge for both.
I needed to install the tuners, then the bridge, then the pickup in that order.
Headstock drilled for tuners. I am planning on changing the tuner buttons to ovals.

There is no picture of installing the bridge. I first put a strip of tape on the body 25.5" from the nut, then installed the E strings and moved the bridge until the strings were even down the neck and the treble E saddle was over the tape line. I angled the bridge back a bit on the bass side and then used a transfer punch to mark the centers of the bridge post holes. I ground the flange off of the bridge post inserts so they will sit flush with the body. (I don't like the strings to be too far off of the wood)
To locate the pickup I used the cover aligned square with the guitars center line and the E strings even over the pole holes. I then drilled the mounting holes. Removed the cover, put the pickup there and secure with the screws to find where the pickup cavity needs to be. This is a one-off pickup install for me so I did not bother making a routing template, I made the cavity with a forstner bit and a chisel.

Fits perfectly.

Lets see how the strings line up.

The poles are not the exact spacing as the bridge, but I've seen worse.
I wimped out from the heat today so next items to do are the control cavity, output jack, pickguard, and headstock overlay.
Here is the full frontal as it sits today.

It's getting very close!
I started out today by making a pickguard from Wenge. I printed the pickguard full size from the .dxf, glue the print to a piece of wenge, and cut it out.

Next I wanted to do a headstock overlay from wenge as well. The stock that I have is .125" and I needed it .040" or so. This is where the safe-t-planer really pays it's way.

Gluing the headstock overlay on. I use a flat piece of maple with quite a few strips of weatherstripping on one surface to make sure that I get even clamping pressure if everything is not dead flat. I used CA glue for this step.

Fast forward through making a cavity template. The control cavity is routed. I only make a template sized for the inner part of the cavity then I use a .250" rabbiting bit to make the shoulder.

Another fast forward, shaping the headstock overlay, drilling the tuner holes, a quick french polish, and a truss rod cover. I have some refinish work to do, I accidentally sanded though the tru-oil when I was matching the overlay to the headstock.

I also drilled the ground and pickup wire holes, installed the output jack, and made an ebony control cavity cover.

Next up, I'll take it all apart and start fine tuning the finish.
And done:


